All promotions
The promotion module in NVL allows you to efficiently manage all your promotional campaigns. It offers an overview of all promotions currently available in the system, whether they are active, inactive, or expired. You can create, edit, suspend, and delete promotions, among other functionalities, ensuring comprehensive control over promotional activities.
To access the promotions, expand the Promotions section on the left navigation panel, and then click All Promotions. The following screen appears:
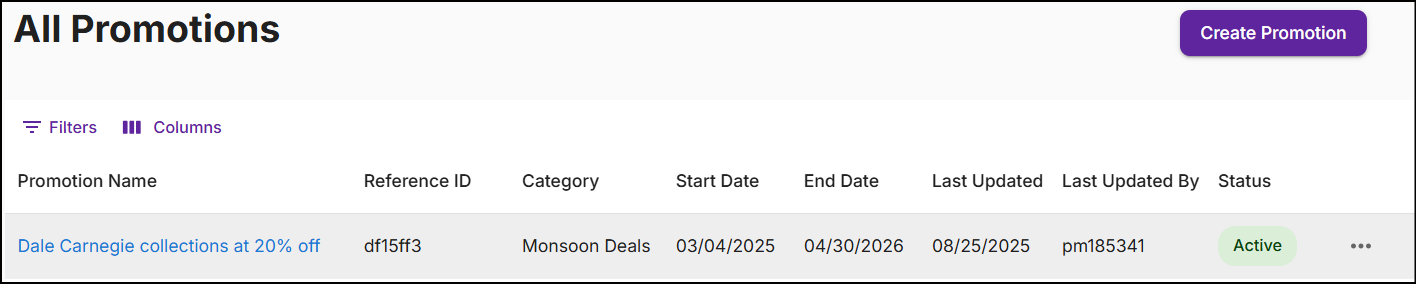
The All Promotions screen displays Promotion Name, Category, Start Date, End Date, Last Updated, Last Updated By, Status, and Ellipsis.
- Promotion Name: The title of the promotion.
- Reference ID: A unique identifier assigned to each promotion.
- Category: Name of the category to which the promotion is associated.
- Last Updated By: The user ID of the individual who last modified the promotion.
- Last Updated: The date when the promotion was last modified.
- Start Date: The date when the promotion is active.
- End Date: The date when the promotion concludes.
- Status: Indicates the current state of the promotion.
- Ellipsis (...) : To edit, delete, copy, and update the status of the promotion.
Create promotion
To set up a new promotion, click the Create Promotion button at the top right corner. Once you create a promotion, it will appear in the All Promotions Module.
For more information on creating promotions, click here.
Promotion status
The status of the promotion is determined by the configured dates for scheduled, testing, active, expired, and inactive periods. Refer to the details section for more information on configuring dates.
| Status | Description |
|---|---|
| Scheduled | The promotion is scheduled to be deployed at testing locations and stores. |
| Testing | The promotion is deployed at the testing locations. |
| Active | The promotion is deployed to the stores. |
| Expired | The promotion has surpassed its active end date and is no longer available at testing locations or stores. |
| Inactive | A promotion is temporarily suspended anytime before the active end date. This status is set manually, unlike other statuses that depends on dates. |
For example, if a promotion is set to be active from January 10th to January 25th, with testing dates from January 1st to January 9th, the status of the promotion will be as follows based on these dates:
- A promotion set to be deployed at a testing location from January 1st to January 9th remains in scheduled status until the testing start date.
- A promotion deployed at testing locations from January 1st to January 9th is in testing status.
- A promotion deployed to stores from January 10th to January 25th is in active status.
- A promotion that ends on January 25th is considered expired on January 26th.
- A promotion's status can be manually set to inactive anytime before January 25th.
Ellipsis (...)
The ellipsis in the promotion module provides options to update status, edit, delete, and copy a promotion.
-
Set as: Select Set as to update the status of the promotion. See Promotion status for more details.
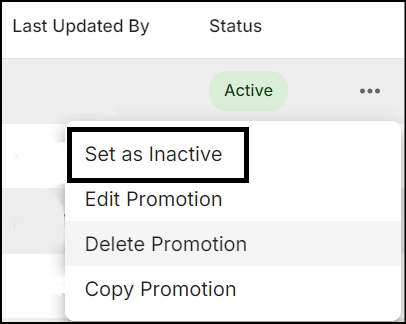
Key actions:
- The statuses of promotions with Scheduled, Testing, or Active can be updated to Inactive and vice versa.
- The status of Expired promotions cannot be changed.
-
Edit promotion: Select Edit Promotion to update the promotion details. Alternatively, click the promotion name to update from the promotion summary. Click here to learn more.
-
Delete promotion: Select Delete Promotion to delete the promotion. A confirmation pop-up will appear to confirm the deletion.
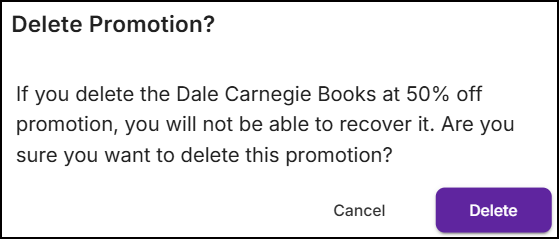
Click Delete. A message 'successfully deleted promotion' will appear on the All promotions screen.
-
Copy promotion: Select Copy Promotion to duplicate the promotion details. A New Promotion screen with the copied details will be displayed. Click here to learn more.
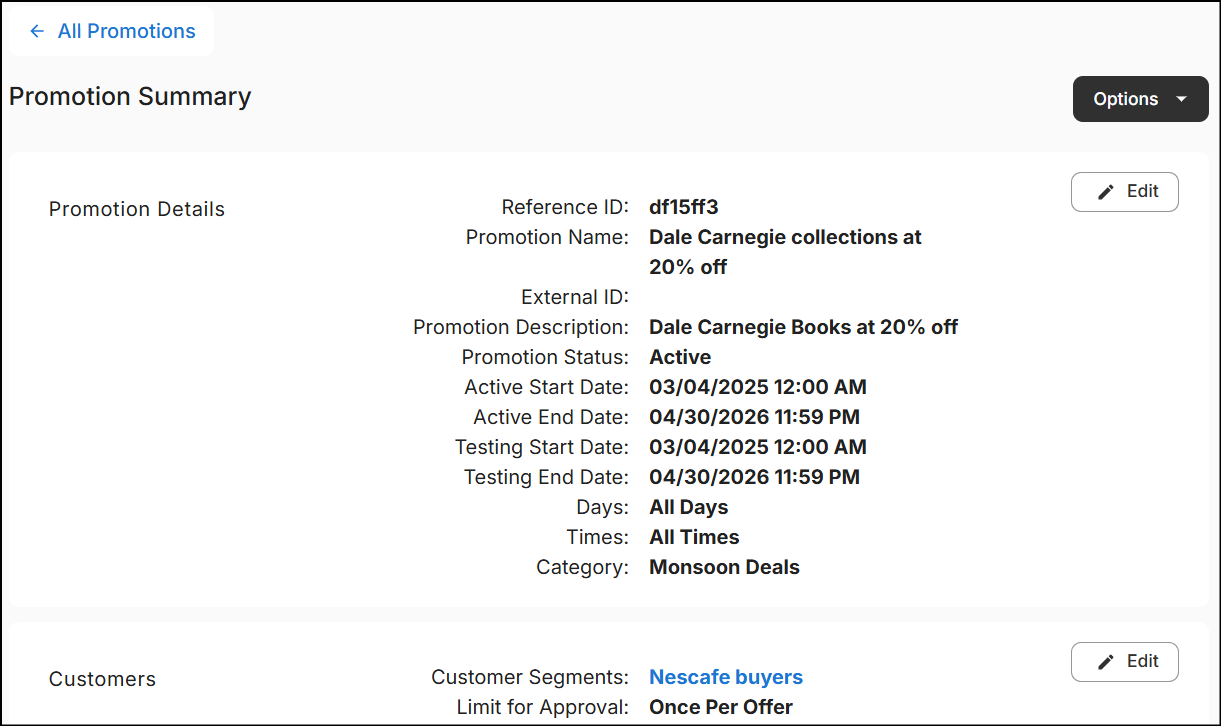
Promotion summary
The promotion summary provides an overview of the details configured in each section during promotion creation. Use the Edit button available for each section to update its details.
Use the Options drop-down in the top right corner to edit, copy, and update the status of the promotion.
Use the quick links in the promotion summary to access the details of consumer segments, product groups, and stores included in the promotion.
Filters and columns
Click Filters to search for promotions, and Columns to customize, reorder, or adjust the column width for maximum visibilty. Click here to learn more.
When the filters are applied and the columns are adjusted, the results will appear as follows:

Sorting
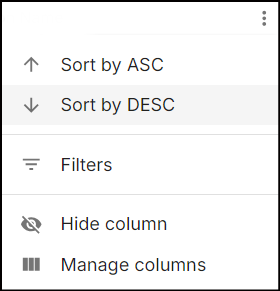
Hover over any promotion column header to find the Down Arrow. Click the down arrow to sort promotions in descending order, and click it again to sort them in ascending order.
Click the Ellipsis next to the down arrow to manage filters, coloumns, and sort by a particular column.
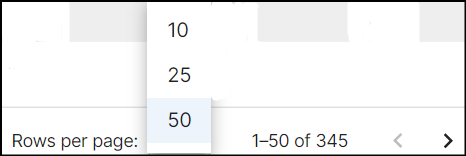
Rows per page
All promotions page displays 10 promotions by default. You can view up to 25 or 50 promotions by selecting the desired option from the Rows per page dropdown at the bottom of the screen.