Working with taxes
Use Settings & Privacy > Taxes to configure as many tax categories as necessary for the items you sell, and designate a specific tax category to use as the default while creating a new item; otherwise, the system defaults the tax category to a 'No Tax' category. You can quickly configure the tax settings to assess the correct sales tax. Also, you can create multiple tax categories, designate a tax category as inclusive or exclusive, and opt to calculate sales tax by a percentage or according to a tax table. If you operate in different locations subject to different tax regulations, you can add new locations. Additionally, you can configure the system to apply a different tax rate for specific order modes, such as delivery.
For example, create a tax category called Food Tax and assign it to food items, such as hamburgers and french fries. Create another tax category called Alcohol and assign it to your alcoholic beverages, such as beer and wine. When you create a guest check for a hamburger, french fries, and a beer, the system calculates the applicable tax based on the tax rate associated with the tax category assigned to each item.
The Settings & Privacy > Taxes function offers two menu options (on the left): Taxes (active by default), and Tax Tables.
Configuring taxes
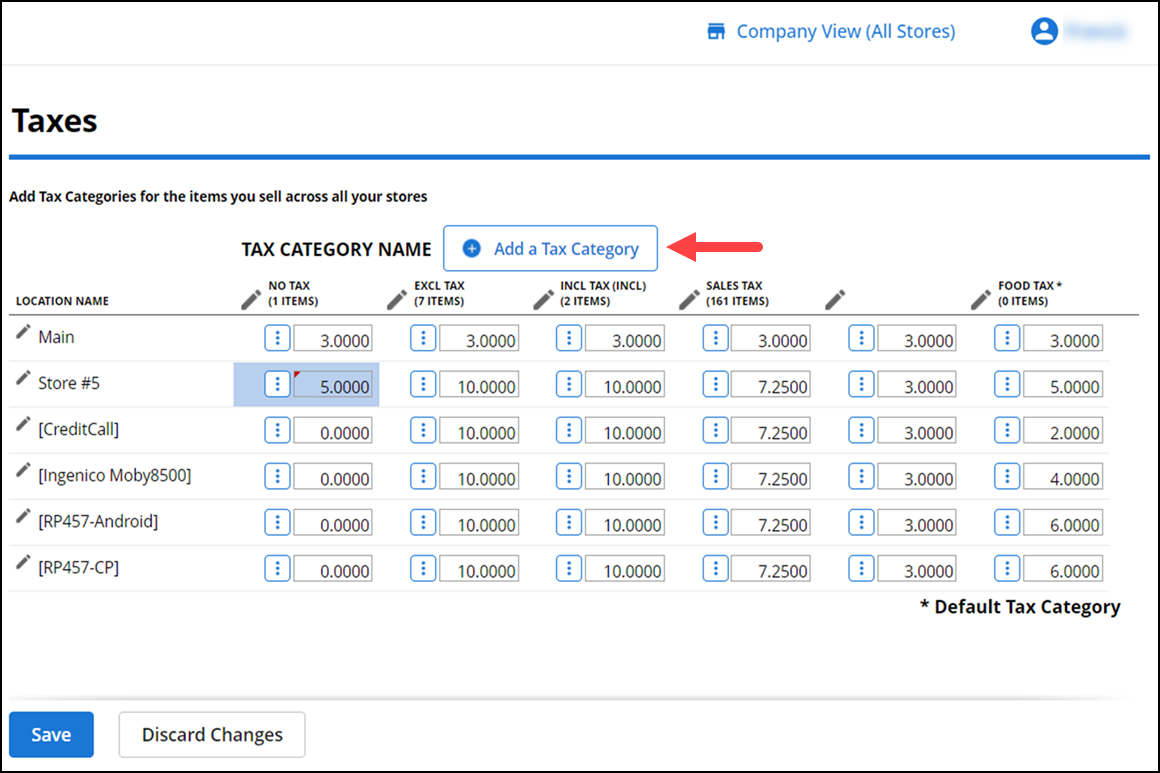
Use the Taxes menu option to define the tax categories needed for the items you sell.
-
Log in to Back Office using Company View (All Stores) or using specific store.
-
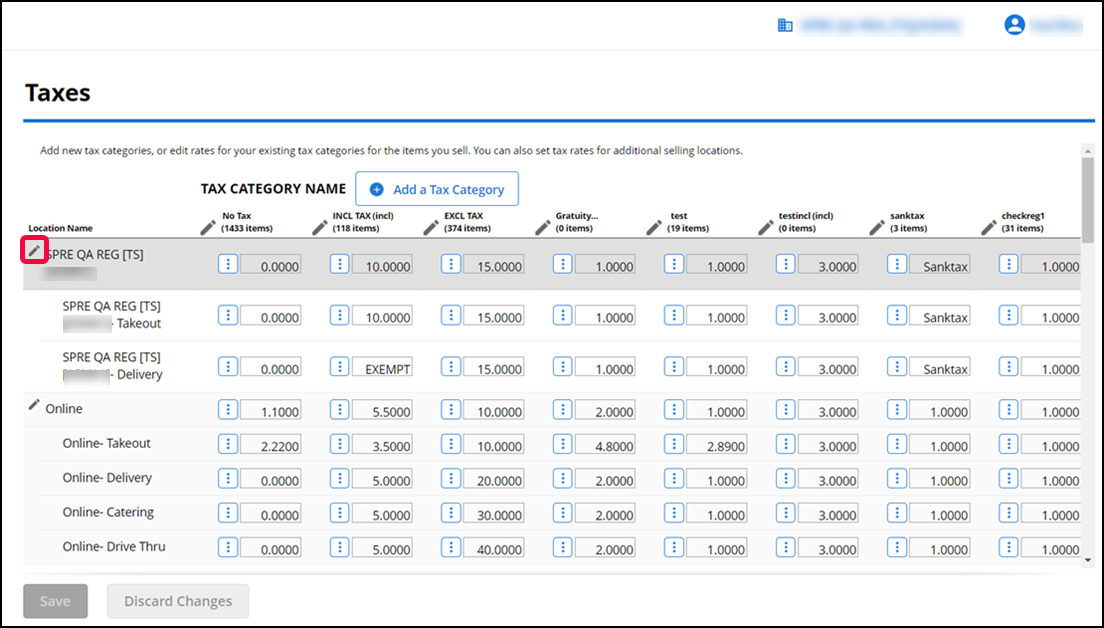
Select Settings & Privacy > Taxes. The Taxes menu option appears by default.
-
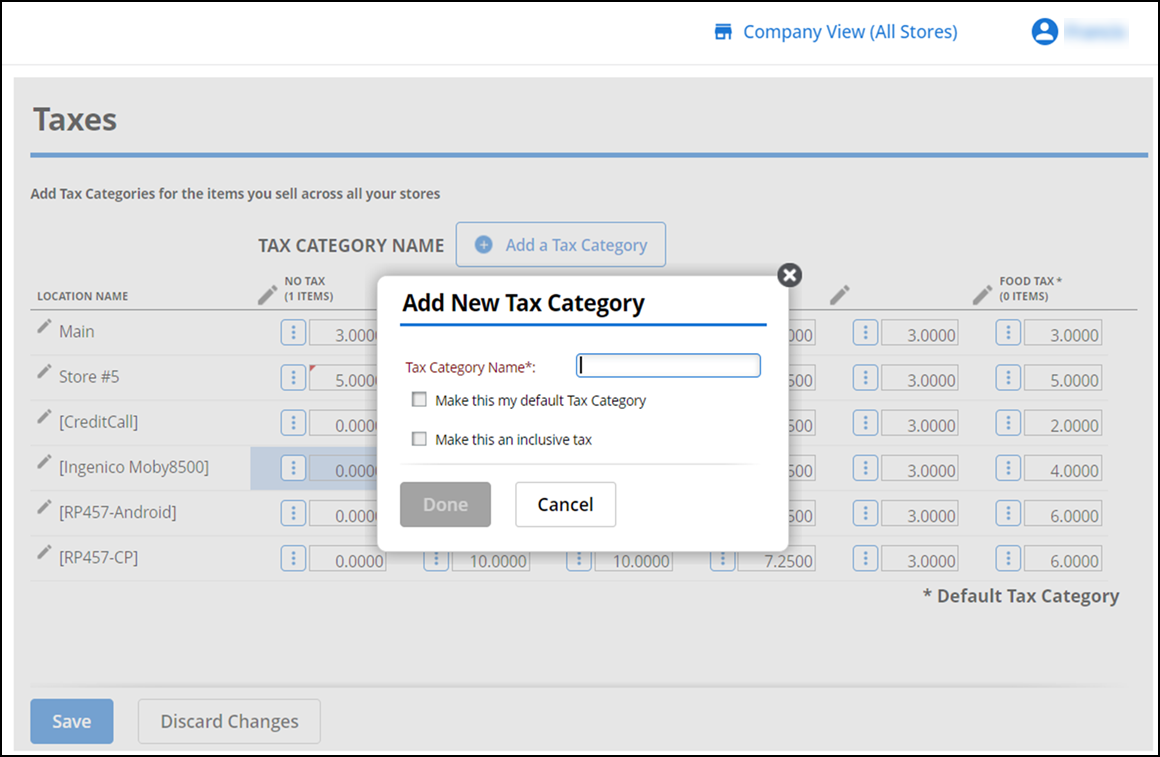
Click Add a Tax Category. The Add New Tax Category screen appears.
-
Type a name for the tax category.
-
Select Make this my default Tax Category, to use this tax category and to apply for your main tax rate. You can only select one tax category as the default. On the Taxes page, the system identifies the default tax category with an asterisk next to the name.
Note: When you create a new item, the system applies the default tax category to the item; however, you can change it if needed.
-
Select Make this an inclusive tax to include the sales tax in the quoted price to make the transaction easier for some items, such as alcoholic beverages. (incl) appears on the Taxes page next to any tax category designated as inclusive.
-
Click Done to return to the Taxes screen. The new tax category appears to the right of Location Name.
-
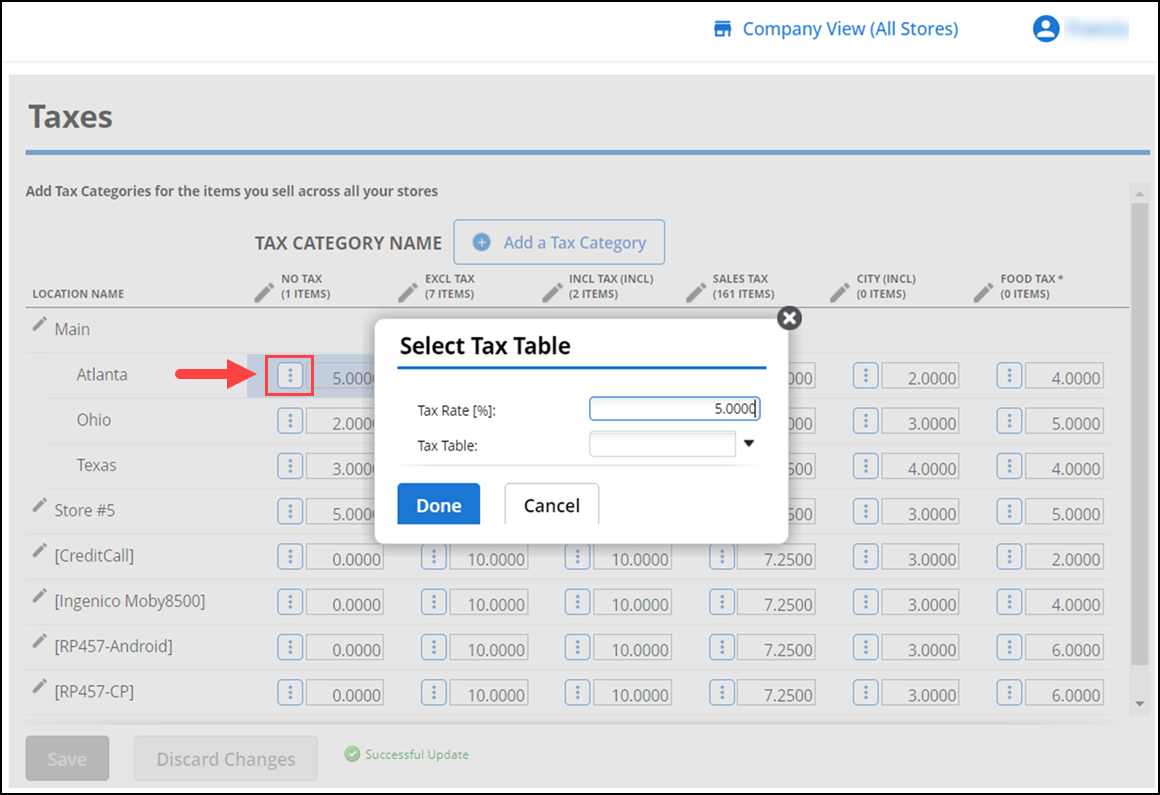
Locate the category just created and type the applicable tax rate.
-OR-
Click the vertical ellipsis icon to select a tax table. The Select Tax Table screen appears. Select a Tax Table from the drop-down list, and click Done. Before you can select a tax table to use, it is necessary to first create the tax table.
-
Click Save.
Working with tax jurisdictions
In some locations, it is mandatory to track the collection of sales tax according to tax jurisdiction and to display the sales tax assessed by tax jurisdiction on the customer receipt. Use Back Office to easily your tax settings to comply with tax jurisdiction regulations.
To work with tax jurisdictions:
-
Log in to Back Office using Company View (All Stores) or using specific store.
-
Select Settings & Privacy > Taxes.
-
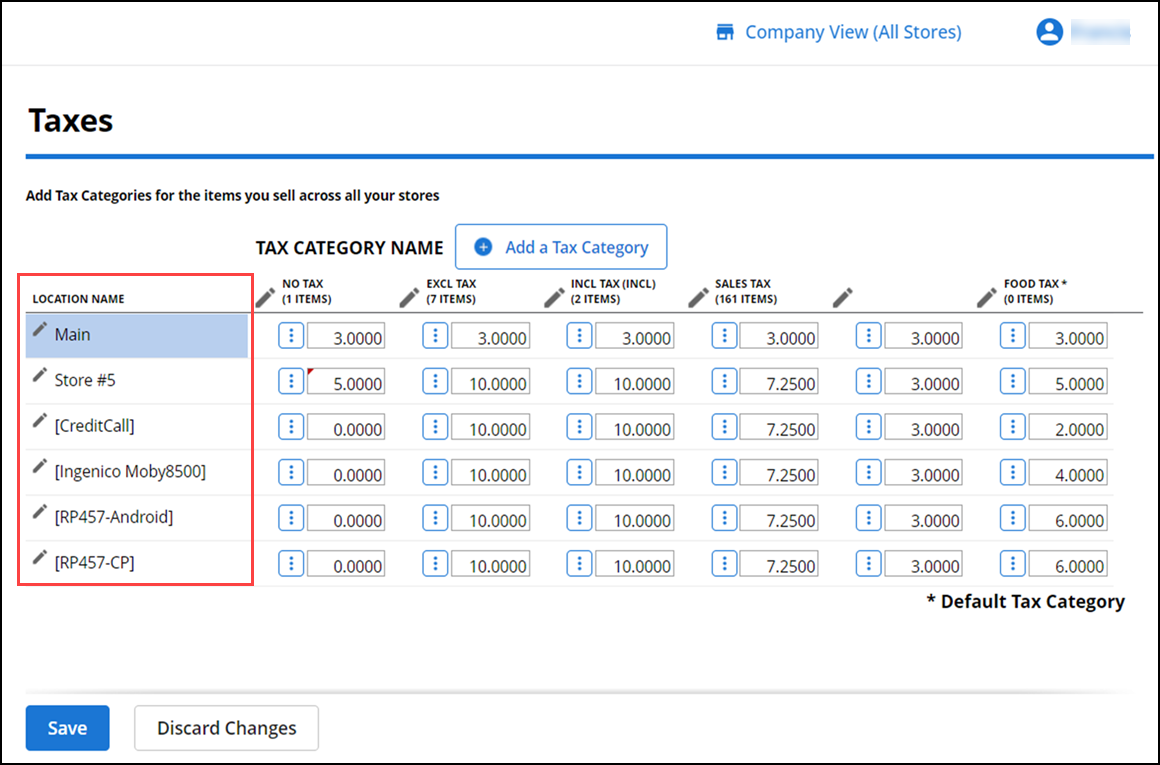
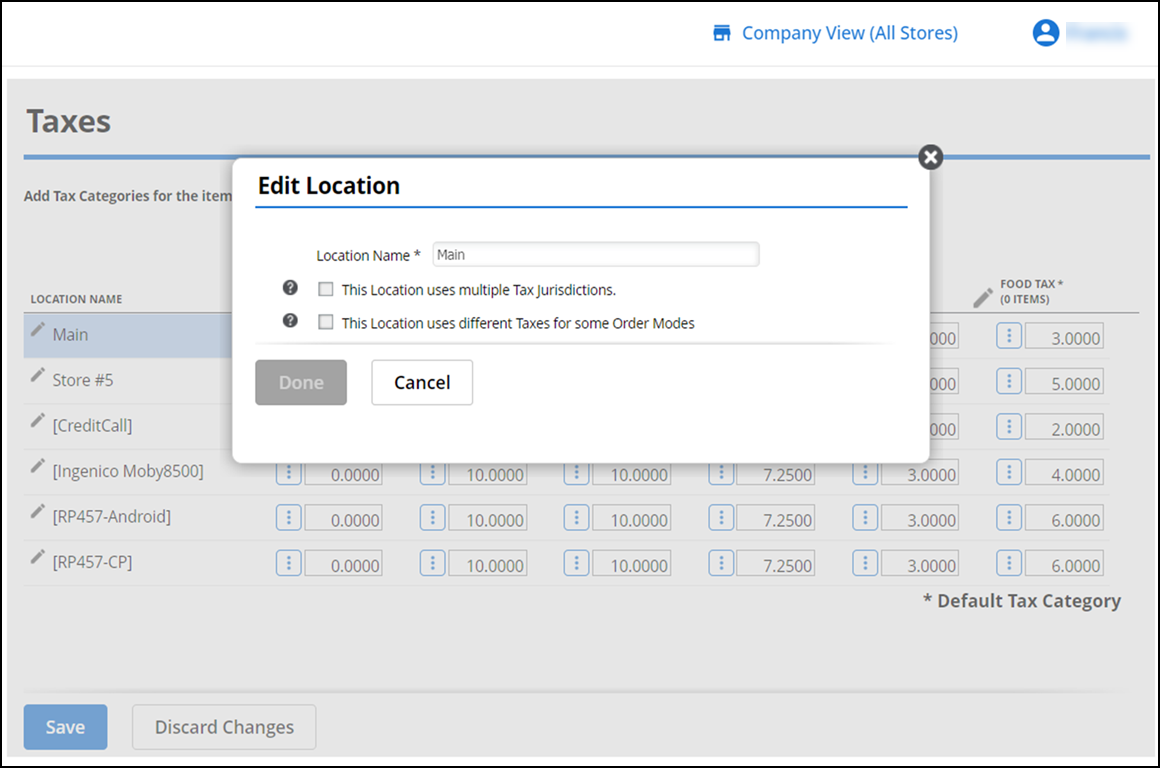
Click a location from the Location Name column. The Edit Location screen appears.
-
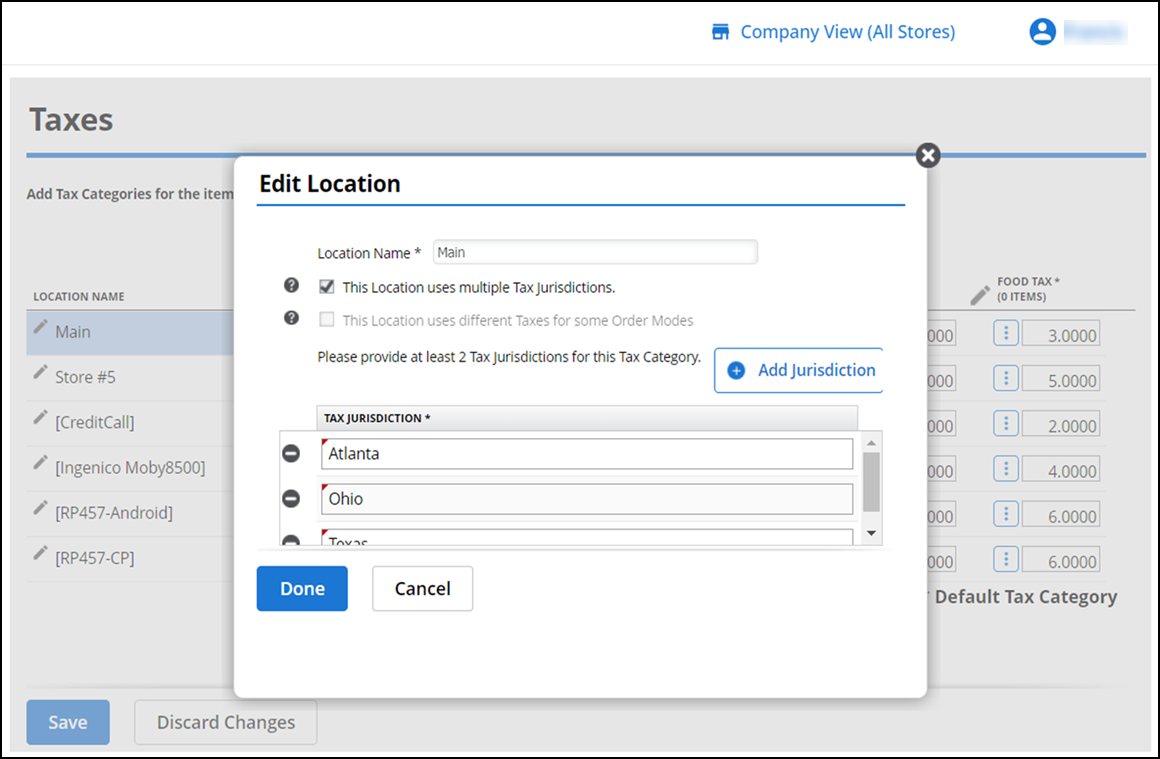
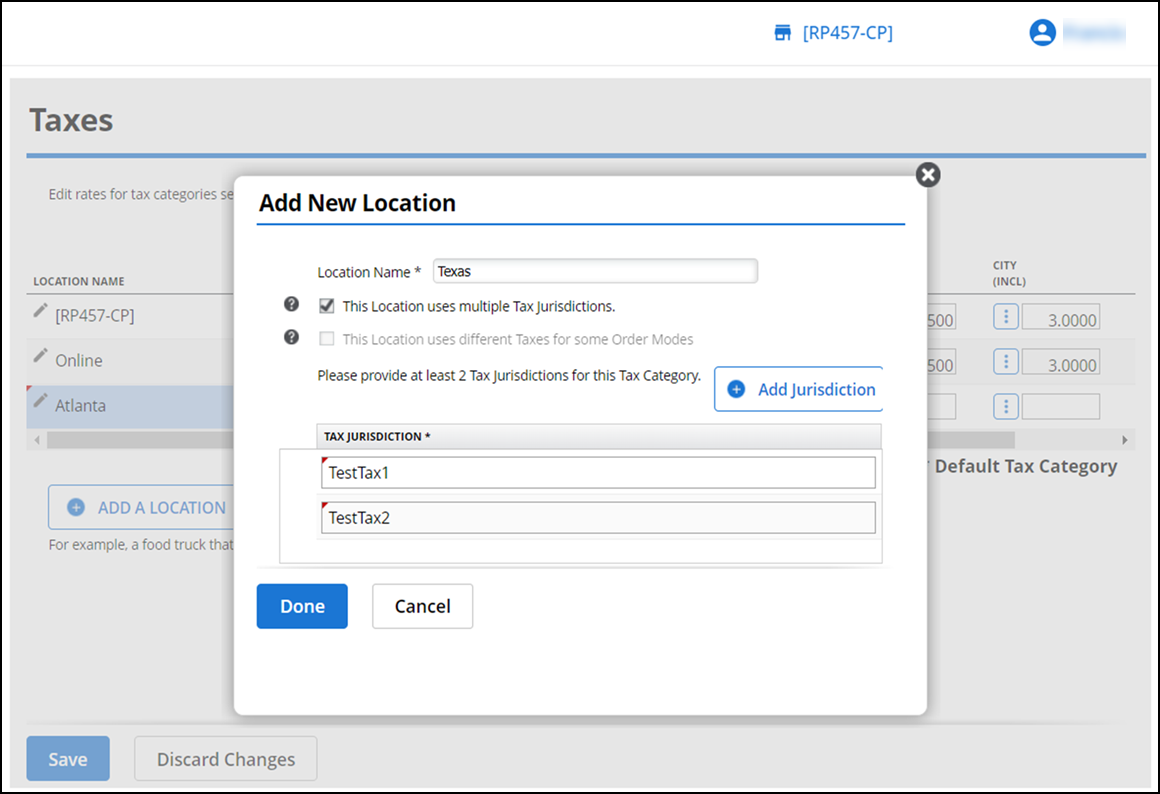
Select This location uses multiple Tax jurisdictions, to include Tax jurisdictions. The Edit Location screen expands.
-
Click Add Jurisdiction to add jurisdiction.
-
Enter a name for each jurisdiction in the fields provided.
-
Click Done.
-OR-
Click Cancel to return to the Taxes screen.
-
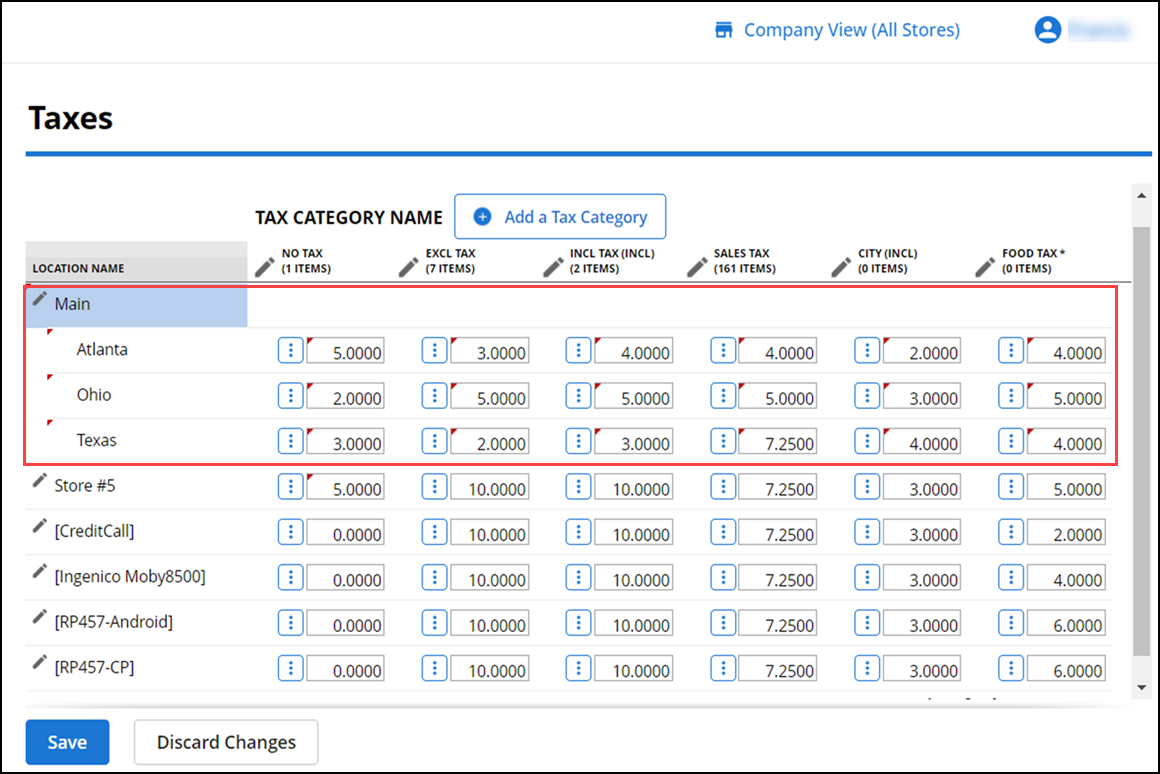
For each tax jurisdiction, enter the tax percentage or select the tax table for each category.
-
Click Save and exit the Taxes screen.
To add new location
-
Log in to Back Office using specific store.
-
Select Settings & Privacy > Taxes.
-
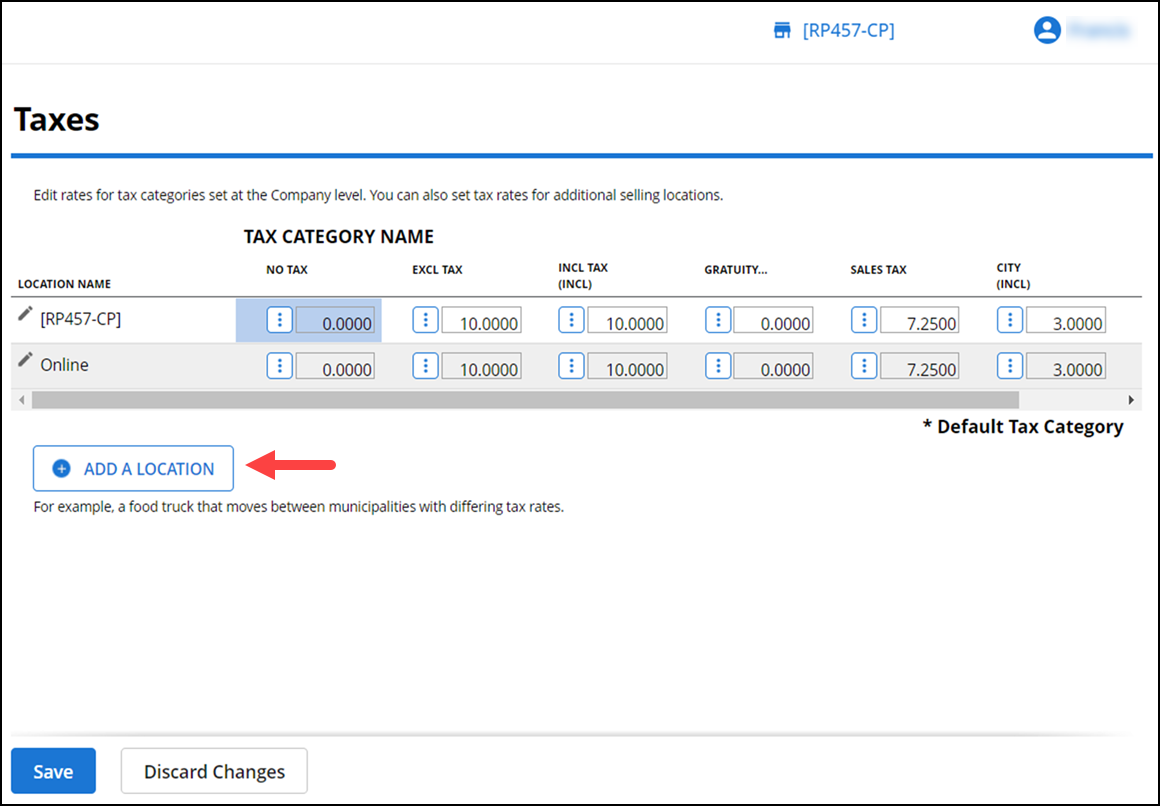
Click Add A Location. The Add New Location screen appears.
<img alt=Click Add a Location" src="https://docs.ncrvoyix.com/images/aloha-cloud/Settings_TaxJurisdctions_AddLocation1.png"/> -
Select This location uses multiple Tax jurisdictions, to include Tax jurisdictions.
-
Click Add Jurisdiction to add jurisdiction.
-
Enter a name to the each jurisdiction in the fields provided.
-
Click Done.
-OR-
Click Cancel to return to the Taxes screen.
-
For each tax jurisdiction, enter the tax percentage or select the tax table for each category.
-
Click Save and exit the Taxes screen.
Configuring tax by order mode
In some cases, tax entities require you to assess taxes based on the order mode of the order, such as for takeout or delivery orders. Aloha Cloud enables you to automatically assess a tax rate based on the order mode of the order. Prior to configuring an order mode tax for Takeout/Delivery, you must enable Takeout/Delivery order mode in Aloha Cloud Back Office.
To configure tax by order mode:
- Log in to Back Office using Company View (All Stores) or using specific store.
- Select Settings & Privacy > Taxes.
- Click pencil icon on the Location Name column to edit the tax location for which you want to create an order mode tax. The Edit Location screen appears.
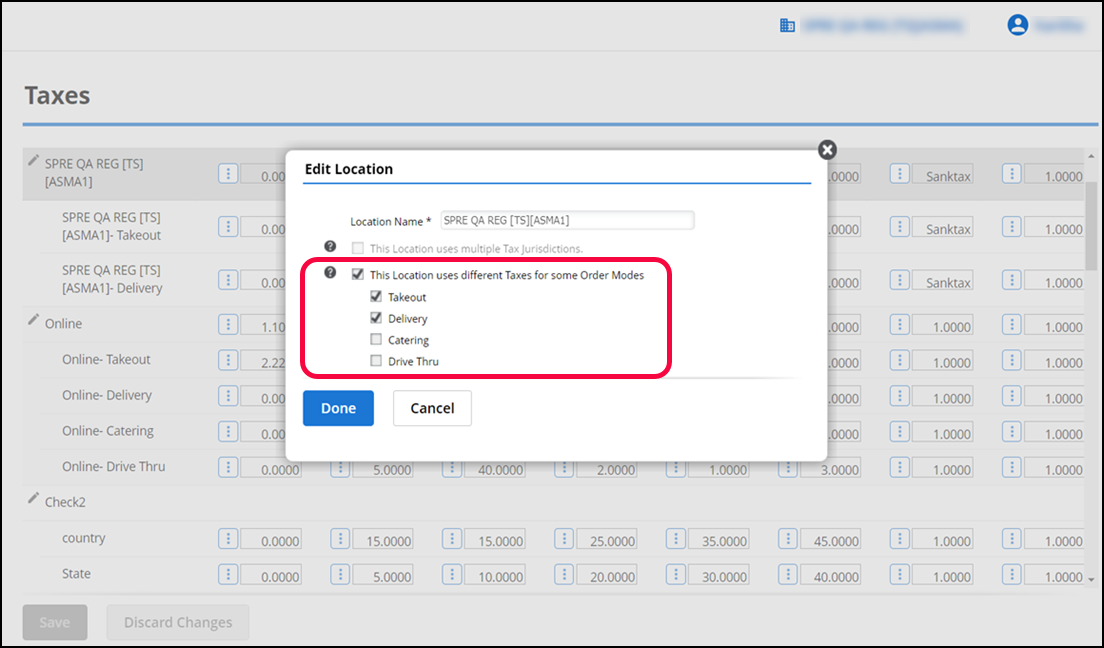
- Select This Location uses different Taxes for some Order Modes, to configure taxes by order modes. The Edit Location screen expands.
- Select the desired order modes to configure tax.
- Click Done.
- Click Save and exit the Taxes screen.
Working with tax tables
Some states require the use of a tax table to calculate sales tax. Use Back Office to create a tax table for each jurisdiction with which you need to comply. Prior to configuring a tax table in Back Office, obtain a copy of the tax table to which you are subject. It is necessary to determine the period of tax repetition for the tax table and the tax amount for each period of tax repetition.
The period of tax repetition is the point at which the tax table begins repeating itself. You determine the point at which your tax table begins to repeat itself by looking at the fractional portion of your specific tax rate. The following table shows the period of tax repetition for the following fractional portions of a tax rate: '.0,' '0.25,' '0.5,' and '0.75.'
Determining Your Period of Tax Repetition:
| Tax Rate % | When the fractional portion of tax rate is: | Your period of tax repetition is: |
|---|---|---|
| 6.0% | .0% | $1.00 |
| 6.50% | .5% | $2.00 |
| 6.25% or 6.75% | .25% or .75% | $4.00 |
You calculate the tax for each period of tax repetition by multiplying the period of repetition by the tax table percentage. For example, if the tax table percentage is 7.75%, then the period of tax repetition is '$4.00.' When you multiply '$4.00' x '7.75%,' the answer is $0.31. This is the tax for each period of tax repetition. Once you determine the period of tax repetition and the tax for each period, you can begin to create a tax table.
Breakpoints are the value at which you must apply a higher tax. When you create a tax table in Aloha Cloud, it is necessary to input the required breakpoints. For example, if the period of repetition is '4.00,' then you would input the breakpoints up to and inclusive of '$4.00.' Consult the tax table for which you are subject to locate the breakpoints.
Note: NCR Aloha Cloud only supports tax tables with exclusive taxes.
To add a tax table:
FLORIDA TAX TABLE SCENARIO
- Log in to Back Office using Company View (All Stores).
- Select Settings & Privacy > Taxes.
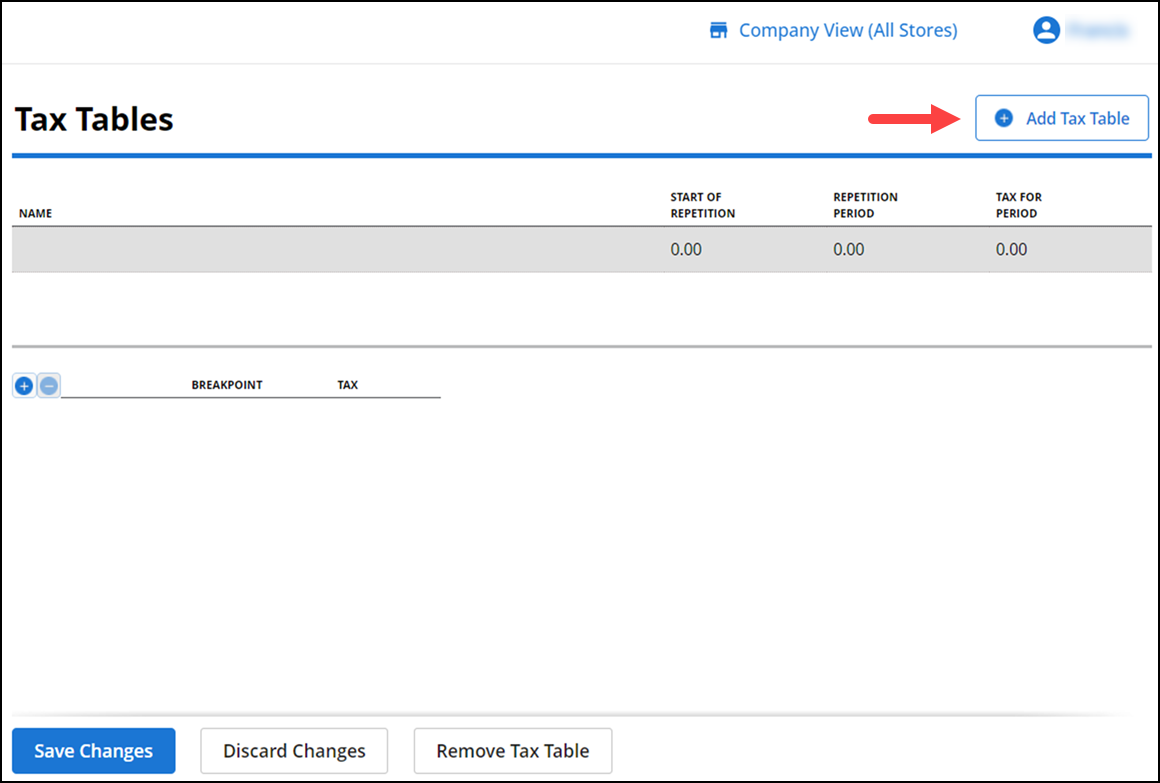
- Select Tax Tables. The Tax Tables screen appears.
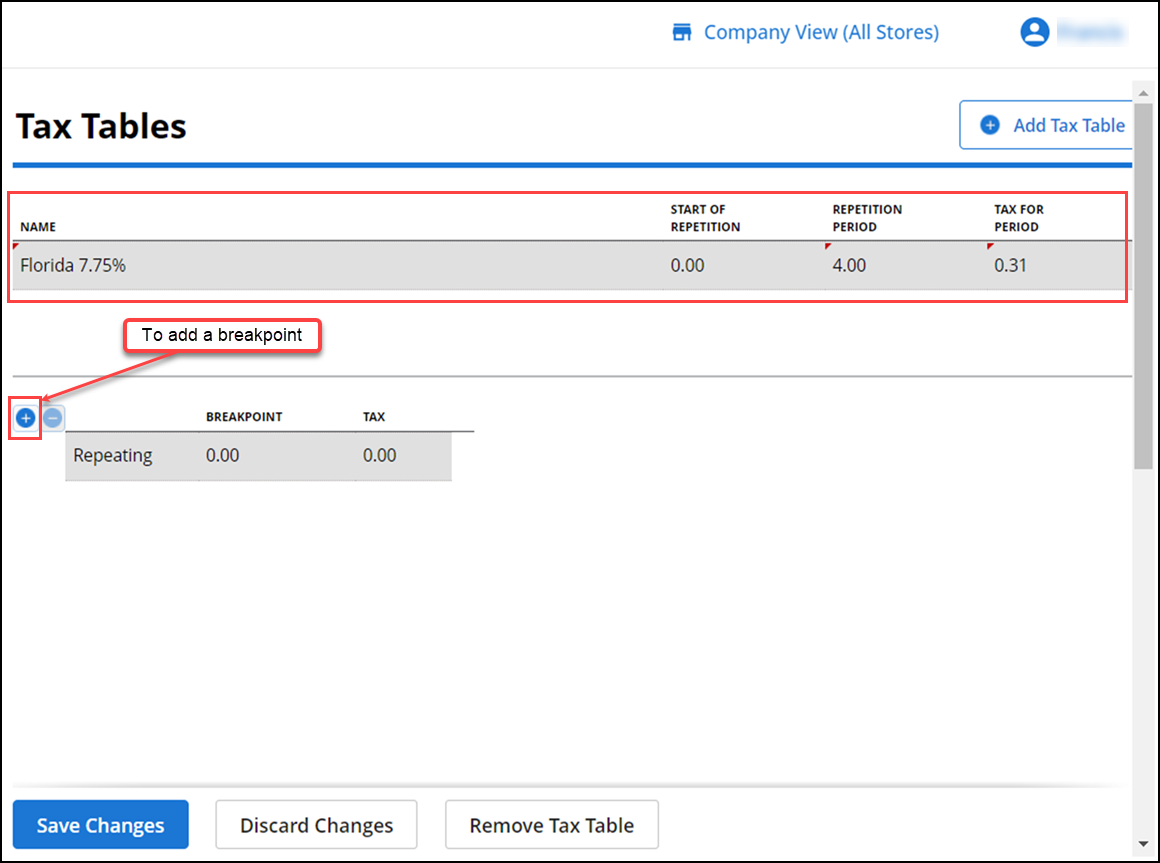
- Type a name for the tax table. For this scenario, type 'Florida 7.75%.'
- Leave the amount as '0.00' for 'START.' In most cases, the amount will be '0.0'; however, in some states, such as Maryland, where the first dollar is taxed differently than subsequent dollars, it is necessary to enter an amount other than '0.00' in START. For more information, refer to the Maryland Tax Table scenario.
- Enter the amount for 'REPETITION.' In this example, enter '4.00,' because the period of tax repetition for a fractional portion ending in '.75' is '4.00.''
- Enter the amount in 'TAX.' In this example, enter '0.31,' arrived at by multiplying the period of tax repetition by the tax percentage. In this example, $4.00 x 7.75% = 0.31.
- Click '+' icon to add a breakpoint for the amount of '0.00,' and then click '+' icon again to add the first breakpoint from your tax table.
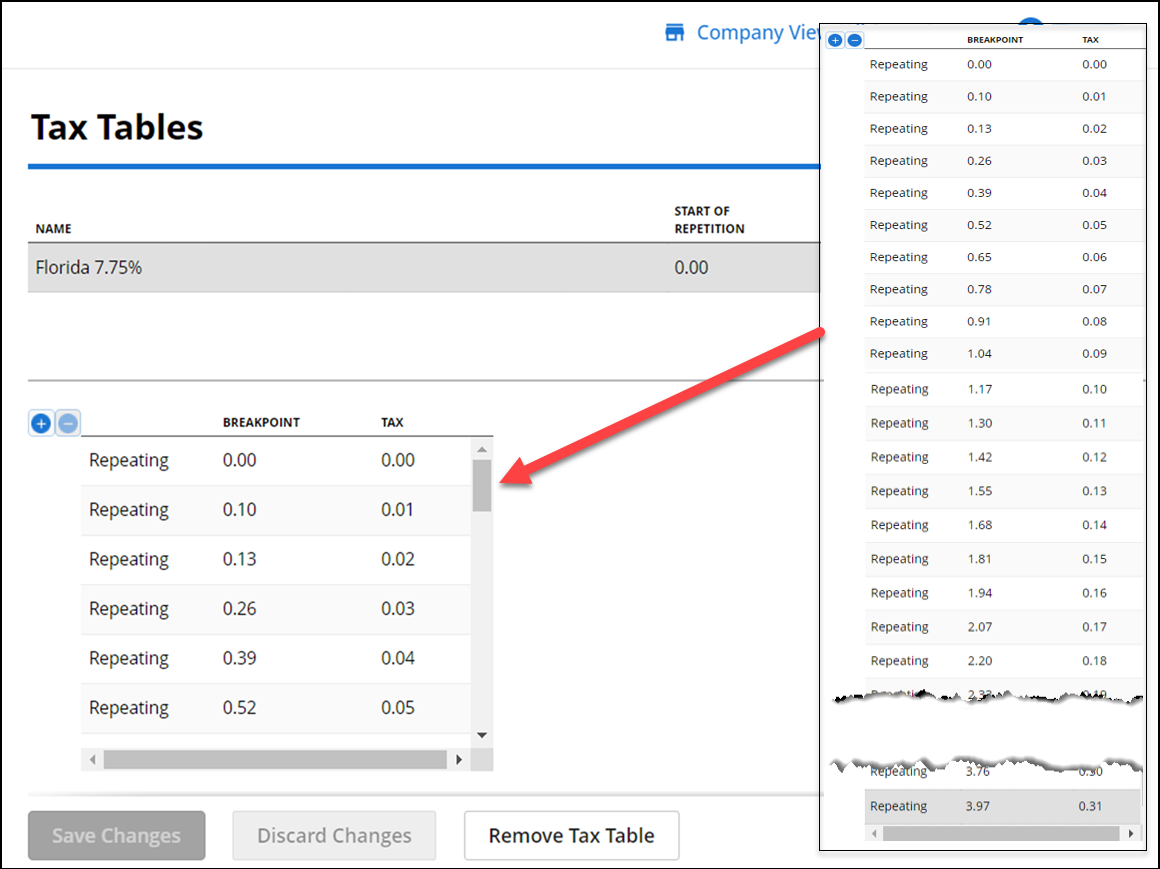
- Referring to the Florida tax table, enter the starting sales amount for the breakpoint. For example, if the sales range for the breakpoint is '.10' to '.12,' you only need to enter '.10.' The system automatically enters the amount for the TAX column.
- Click '+' to move to the next breakpoint. In this scenario, the system inserts a breakpoint at the beginning of the table to account for the sales amounts less than '.10,' and the breakpoint you just entered becomes the second breakpoint.
- Repeat for as many breakpoints as necessary. In this example, the period of repetition is 4.00. Enter breakpoints up to the sales amount of '$4.09.'
- Click Save Changes. Refer to 'Setting Up a Tax Category' for how to specify a tax table for a tax category.
MARYLAND TAX TABLE SCENARIO
-
Log in to Back Office using Company View (All Stores).
-
Select Settings & Privacy > Taxes.
-
Type a name for the tax table, such as 'Maryland 6.00%.'
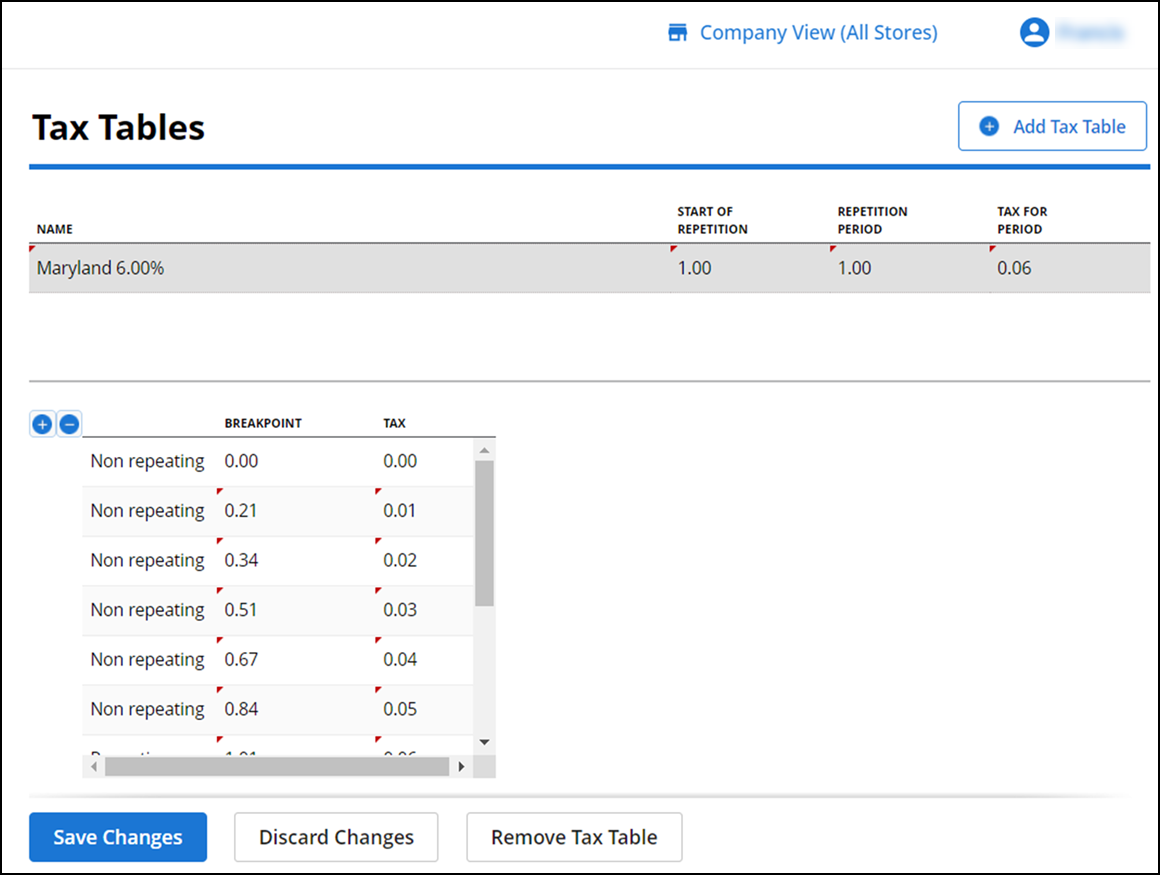
-
Enter the amount for 'START.' In this scenario, enter '1.00,' to indicate the tax calculation changes after the first '$1.00' of sales.
-
Enter the amount for 'REPETITION.' In this scenario, enter '1.00,' because the period of tax repetition for a fractional portion ending in '0' is '1.00.'
-
Enter the amount in 'TAX.' In this scenario, enter '0.06,' arrived at by multiplying the period of tax repetition by the tax percentage. In this example, $1.00 x 6.00% = .06.
-
Click + to add a breakpoint for the amount of '0.00,' and then click + again to add the first breakpoint from your tax table.

Note: When entering breakpoints for tax tables which include a start of tax repetition, it is necessary to enter the breakpoints for the values before the start of tax repetition, known as non-repeating breakpoints, and for the breakpoints until the repetition occurs, known as repeating breakpoints. In this scenario, it is necessary to enter non-repeating breakpoints up to '1.00,' when the period of repetition begins, and from '1.00' to '2.00,' when the tax table begins to repeat. You only need to enter the breakpoint and tax amounts. NCR Silver Pro determines whether the breakpoint is repeating or non-repeating.
-
Referring to the Maryland tax table, enter the starting sales amount for the breakpoint. For example, if the sales range for the breakpoint is '- - -' to '.20,' you only need to enter '.01.' The '- - -' is equivalent to '0.00,' which is not a valid sales amount; therefore, it is necessary to begin with '0.01.'
-
Enter the applicable tax for the sales amount entered in step 8. In this scenario, enter '.01.'
-
Click + to move to the next breakpoint. In this scenario, the system inserts a breakpoint at the beginning of the table to account for the sales amounts less than '.01,' and the breakpoint you just entered becomes the second breakpoint.
-
Repeat for as many breakpoints as necessary.
Note: In the Maryland tax table example, add as many breakpoints as needed to get to the start of repetition, which we determined is $1.00. As you enter the breakpoints, the system determines the entries are non-repeating until you reach the '$1.00' breakpoint. Continue adding breakpoints for the period of repetition, which, based on the fractional portion of the tax rate, is one additional dollar. In this example, you would enter breakpoints up to $2.00. As you enter the breakpoints for the period of repetition, the system determines these are repeating breakpoints.
Note: If the fractional tax portion of the tax rate was .25%, then your period of repetition would be $4.00. You would enter breakpoints up to $5.00; since the start of repetition does not begin until $1.00.
-
Click Save Changes.
View video
Please allow time for the "Setting Up Taxes in Aloha Cloud" video to load.