NetGear wireless extender setup
If you have more than one iOS device that needs to print to the same kitchen printer and a wired connection is not possible, we recommend you use the NetGear Universal WiFi Range Extender (WN2000RPT) to extend wireless connectivity to your kitchen printer.
Getting started
- Start by placing the extender within reach of your kitchen printer and plugging the extender into an electrical outlet.
- Power on the extender.
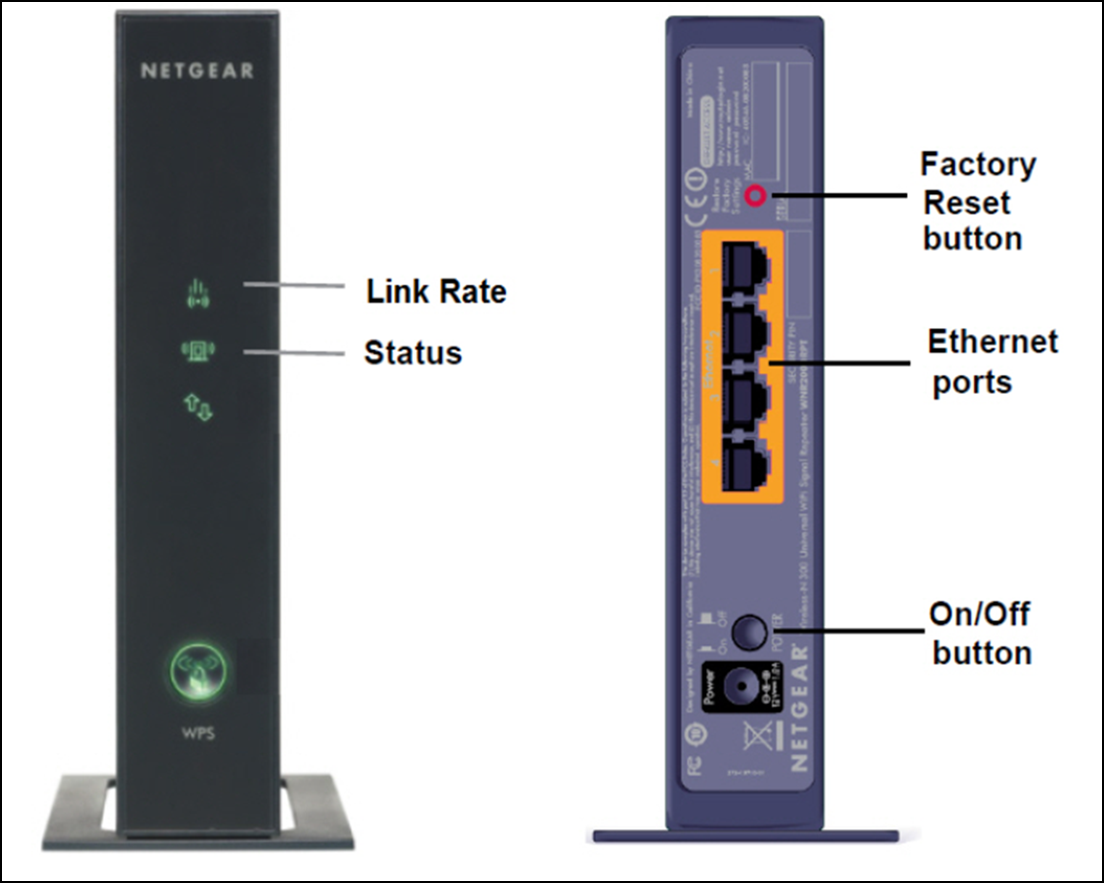
- Wait one minute for the extender Status LED to turn green.
Connecting the extender to an existing Wi-Fi network
- On the POS device, tap the settings icon to open the Settings app and then tap Wi-Fi.
- Locate the wireless network NETGEAR_EXT (SSID) and tap it to connect. The extender Link Rate LED should turn green once a good connection is established.
- From the same device, open a web browser to view the on-screen setup guide. If you are not taken directly there, navigate to www.mywifiext.net.
- The web browser walks you through the following steps:
- Selecting and joining the existing wireless network to use for your kitchen printer.
- Renaming the new extended network. We recommend the default setting (adds “_ext” to the existing name).
- Adding your POS device to the new extended network.
Connecting the kitchen printer
- With the printer powered off, connect the printer to any one of the four Ethernet ports on the back of the extender using the supplied Ethernet cable.
- Power the printer on and wait two minutes.
- Power the printer off, hold down the Feed button, and power the printer back on while continuing to hold down the Feed button until the printer beeps three times.
- On the printer self-test receipt, look for IP ADDR: followed by a number beginning with 153.xx.xxx.xxx. If you do not see 'IP ADDR' or if it appears in any other format, unplug the kitchen printer and repeat steps 1 through 3.
- Wait for the printer self-test receipt to complete printing and then press the Feed button once more to exit the printer setup mode. Save the self-test receipt.
Configuring the kitchen printer
- Log in to the POS.
- Tap the Home icon and then tap the Settings icon.
- Tap Configure Printers.
- Tap Find New Printer.
- Tap Wired Directly to Router.
- Perform one of the following:
- If the POS app finds the printer, configure it and tap Done. This completes the setup process.
- If the POS app does not find the printer, continue with step 7.
- Follow the on-screen instructions and enter the IP address found earlier on the self test receipt. The IP address should begin with 153.xxx.xxx.xxx.
- If you see an error message, you need to enter the IP address again before it is accepted.
- If you continue to see the error message, reprint the IP address and confirm the address is correct.
- Once the printer is found, configure it and tap Done.